what is the meaning of public static final string SOME_VARIABLE = "variable text"
final indicates that the value of the variable won't change - in other words, a variable who's value can't be modified after it is declared.
Use public final static String when you want to create a String that:
belongs to the class (static: no instance necessary to use it), and that
won't change (final), for instance when you want to define a String constant that will be available to all instances of the class, and to other objects using the class.
Similarly:
public static final int ERROR_CODE = 54654;
It isn't required to use final, but it keeps a constant from being changed inadvertently during program execution, and serves as an indicator that the variable is a constant.
Even if the constant will only be used - read - in the current class and/or in only one place, it's good practice to declare all constants as final: it's clearer, and during the lifetime of the code the constant may end up being used in more than one place.
Also, you may access the value of a public static string w/o having an instance of a class.
static means that the object will only be created once, and does not have an instance object containing it. The way you have written is best used when you have something that is common for all objects of the class and will never change. It even could be used without creating an object at all.
Usually it's best to use final when you expect it to be final so that the compiler will enforce that rule and you know for sure. static ensures that you don't waste memory creating many of the same thing if it will be the same value for all objects.
public makes it accessible across other classes.
what-is-difference-between-public static final and public final static
Saturday, 24 June 2017

Tuesday, 5 July 2016
How to add ISTQB certification to linked in profile
Here follow these steps to add any certification as below steps so that
First click on your Profile in Linked in
Just below to your details there is a option "Add a section to your profile" In that block click on "View details"
 Click on View more

Select certifications
Now fill details


First click on your Profile in Linked in
Just below to your details there is a option "Add a section to your profile" In that block click on "View details"


Select certifications
Now fill details
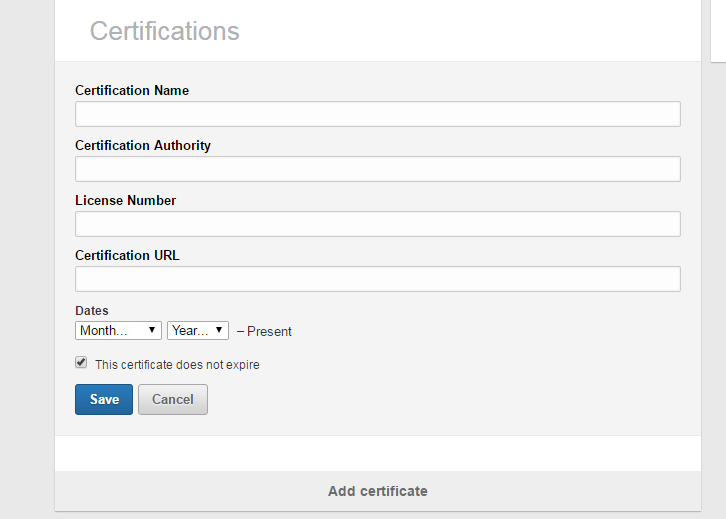
Click on Save button so that it will appear as below on your linked profile.

How to connect to shared drive on mac
Step 1: First please check whether you have connected to your company network or not ? if not connect to your LAN or internet network and in my company scenario I have to connect to blue cable to my mac laptop.
Step2: Click on Finder icon or by minimising all browsers for windows come into Desktop
Step 3: From keyboard click Cmd + K or In the Finder , Choose Go > “Connect to Server”
Step 4: It will open “Connect to Sever” window
Step 5: On the “Server address” give your shared drive address
machinename/foldername1/foldername2
and click on “Connect” button It will ask for User id and password please give your system user id and password
it will generate as below
smb://machinename/foldername1/foldername2

Just in case if you need to keep as a further reference click on + icon
Just in case if you want to remove even you can remove by clicking on Remove button.
More details you can get here
https://support.apple.com/kb/ph10644?locale=en_US
Step2: Click on Finder icon or by minimising all browsers for windows come into Desktop
Step 3: From keyboard click Cmd + K or In the Finder , Choose Go > “Connect to Server”
Step 4: It will open “Connect to Sever” window
Step 5: On the “Server address” give your shared drive address
machinename/foldername1/foldername2
and click on “Connect” button It will ask for User id and password please give your system user id and password
it will generate as below
smb://machinename/foldername1/foldername2

Just in case if you need to keep as a further reference click on + icon
Just in case if you want to remove even you can remove by clicking on Remove button.
More details you can get here
https://support.apple.com/kb/ph10644?locale=en_US
Monday, 26 October 2015
package org.junit does not exist
package org.junit does not exist
Your Test class might be located in src/main/java.
Also the value of the "scope" element in the POM for JUnit was "test", although that is how it is supposed to be.
The problem was that You had been sloppy when creating the test class in Eclipse that is
resulting in it being created in src/main/java insted of src/test/java.
So put your .java class in src/test/java
And in pom.xml just add <scope>test</scope> for junit dependency if it is already existed.
<dependency>
<groupId>junit</groupId>
<artifactId>junit</artifactId>
<version>4.11</version>
<scope>test</scope>
</dependency>
Your Test class might be located in src/main/java.
Also the value of the "scope" element in the POM for JUnit was "test", although that is how it is supposed to be.
The problem was that You had been sloppy when creating the test class in Eclipse that is
resulting in it being created in src/main/java insted of src/test/java.
So put your .java class in src/test/java
And in pom.xml just add <scope>test</scope> for junit dependency if it is already existed.
<dependency>
<groupId>junit</groupId>
<artifactId>junit</artifactId>
<version>4.11</version>
<scope>test</scope>
</dependency>
Wednesday, 21 October 2015
How to clear passwords in firefox
Some times even though we clear cookies passwords saves in firefox browser because on firefox passwords stores on security tab. to clear those passwords we have to navigate to the below path .
On firefox Click on right corner tab and click on Preferences it navigates to
about:preferences

Security-> Saved Passwords

then click on Remove all button

about:preferences
Security-> Saved Passwords
How to test your website for different countries just by setting proxy ip address on browser
If you are test your website for different countries just by sitting in UK if you want to see how your site behaves to USA clients. You can test by setting proxy in your browser.
Fox proxy chrome type in google for plug in and install
Open browser on right side you see blue icon click on that
It should open this extension

click on Options
Then click on Add new proxy

Under Proxy details tab

Enter your country ip address Host or IP Address
for example USA IP address 69.147.161.182:8080
Ip address you can get from here
http://www.samair.ru/proxy-by-country/United-States-01.htm

To choose different country ip
http://www.samair.ru/proxy/

If you want to give name to the proxy whatever you have created

After that click on SAVE button
Open a browser and click on right side blue icon


Enable to click on your proxy
Now clear all your cookies and open new tab of browser
Or else you can open site in
incognito tab
now search for www.google.com .. It should open .com site since we setup USA proxy ip address .
As a results you can sit in any country for example in UK but if you want to see how your site behaves to USA clients
ANDROID_HOME not set appium java
Where the Android-SDK is installed depends on how you installed it. If you downloaded the SDK through their website and then dragged/dropped the Application to your Applications folder, it's most likely in /Applications/ADT/sdk (as it is in your case).
If you installed it using Homebrew (brew install android-sdk), then it's located here:
/usr/yourusername/android-sdks
env | grep ANDROID_HOME on the terminal that is working. If the file is already existed This should give something like
ANDROID_HOME=/usr/yourusername/android-sdks
If not they do changes on Bash file
Type below command to check whether bash_profile existed or not
ls -1 ~/.bash_profile
If it is not existed then it message throws as “No such file or directory”
touch ~/.bash_profile
now open .bash_profile, if you dont have one just create one
vi ~/.bash_profile
Add the following:
esc + i it allow to enter data into vim editor
#set ANDROID_HOME
ANDROID_HOME=/usr/yourusername/android-sdks
export ANDROID_HOME
Once you have this set, you need to add this to the PATH environment variable
export PATH=$PATH:$ANDROID_HOME/tools:$ANDROID_HOME/platform-tools
Now save the file by pressing below commands esc + :wq
And after that to execute bash file
source ~/.bash_profile
Now if you type this command it should show path
echo $ANDROID_HOME
Subscribe to:
Posts (Atom)